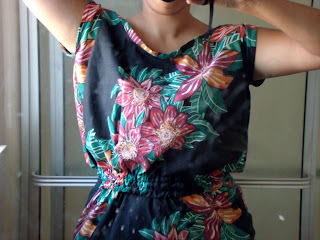
Nerves and anxiety have overcome me, along with so much creativity, I am not sure I know how to contain it.
I was asked if I wanted to submit some of my clothes in a fashion show in FL at the end of this month. I said of course but now have the dilemma of what to submit.
I have gone with the theme of the blues and these are some of the prints I have. I should have everything ready to go by the end of the week. Stay tuned!
Retro Swingy Tie Top Tutorial
Author: Psychodivamom / Labels: DIY, girls, retro, summer, tie, top, tutorial |
 Attaching the strap is pretty easy. I find the easiest way is to iron the strap in half and do the same with the back of the shirt. Then line up the middle markings. Pin the strap on the out side of the shirt. Leave a gap of 2-3 inches of the strap between the connection of the front and back.
  See the strap all the way around. Fold the strap up and iron. Then see around the top of the strap to reinsure it stays up.
 Thanks for coming to my blog. I hope to share some of my pieces that I have made, good and bad. Critiques are always welcome, but let's remember, I am by no means a professional, so this is just a passion of mine. In other words, don't cut me down just to be malicious. I hope you guys can get some ideas of your own, and that I am articulate enough to even post some tutorials. Enjoy my blog and Welcome to my first post.
I have my daughter's 4th birthday, along with one of her friends birthday, just days prior and then my husband's birthday a few days after hers. Sigh!
So I have decided that we need to celebrate with some hand made items. I am trying to tackle a birthday outfit, a hair accessory, along with a plush monster which resembles the Hulk ala Biker Gang and an attempt at a monster truck. Kids seem to adore plush items so let's hope these don't conquer me.
I will have pictures of the pieces as they come. I have almost finished the cupcake hair piece, but that is the smallest one. Let's see how I fare this time next week.
Hey there everyone. I have been MIA for a while, and a lot has changed-including bringing baby #5 into the world this year. So I have been on the creative bug again, and since the boobies are no longer for fun, but instead for nutrition... I have been trying to accommodate them with halfway decent clothes.
I have been following Prudent Baby for a while because there are some awesome tutorials on there. I came across the Most Flattering Shirt Dress and loved it. However, I am trying to find clothes right now that I can nurse in that are not the usual layers. So I decided to change up the dress a bit to be used for nursing. This involved making the front separate for pulling up and down, all while maintaining the look of a dress and stays put. This is the finished product, which I am pretty proud of!
I didn't have elastic thread, so I did a casing on the inside and put elastic through it for the shirred look.
It has been a while since I have shown some of my work I did with a bit of repurposing. I love to find new ways to use a piece of fabric or clothing instead of just junking it or turning into rags.
I made a few dresses for Amelie, and she loves them. I even made myself a little something (Yay)
Designer Infants
Author: Psychodivamom / Labels: designer, inspiration, juicy couture, marc jacobs, ralph laurenI have been super busy with homeschooling my boys and balancing spending time with my girls. Let me tell you, that is one hectic way of life, but I am so glad I am able to do it with them. Teething fevers and cutting teeth, along with a 1st birthday and trying to get a handle on the boys made for a very eventful last 2 weeks. So i am back, and here to talk about dresses. Oh, how I love dresses, especially those designer duds!
I sit there and drool over designer clothing constantly, but let's face it, designer clothing for a child who may wear it once is pretty ridiculous. There is always something that I see that is so simple, yet it costs $300. Oi, that is a strike to the bank! So here are some of my currents that I am loving and seem like it wouldn't be too hard to turn into your own DIY project.
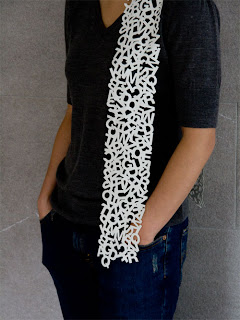
I must admit that my favorite things about fall are sweaters, scarves, beanies and boots. Ok, the leaves and colors, and the wonderful smells are also very satisfying. But now that it is getting a bit chilly in the evening in my part of the state, I am really longing for some of these things. I need a new funky, yet stylish scarf to call my own.
These are some of the scarves that I really like. They are a bit funky, and fun... and would be great to wear with the right outfit. They also look like they can be fairly easy to make.
Since I love upcycling and repurposing, this one is a favorite of mine.
Since my boys are at that age where they want to cool and hip, I am becoming more in tune with what they like versus what I like. So browsing what is available right now, I fell head over heels for these cardigans ala Mr. Rogers in a cool geek kind of way. I am not so sure my boys will feel the same, but I am thinking it will be worth a shot to replicate this.
Upcycling: Western shirt to Bubble Shorts
Author: Psychodivamom / Labels: DIY, repurpose, shirt, shorts, upcycleI came across this red and white western shirt and thought I should do something with it. Initially the idea was to make it a sleeveless blouse to wear with a skirt, shorts, whatever. But the fabric was so thin, I was to scared to try to remove the massive pockets from what would be my breasts.
So when I started cutting, I realized it was the perfect cut for shorts. I Cut the middle snaps off and put them aside, and then started sewing away. About 45 minutes later, Amelie had a new pair of bubble shorts which only required thread and elastic.

Spring is in the Air
Author: Psychodivamom / Labels: dress, feminine, johnathan sanders, spring 2011, vivienne westwood2011 collections of course. I was drooling over all of the pieces I will never be able to afford and I am just in love with Jonathan Saunders collection and of course, Vivienne Westwood never fails me. These are some of the pieces that really stick out for me.


Avant garde is always a favorite of mine. However, the costumeness and the large amount of fabric is not something in my near future. So when I came across children's couture, it seemed like a match made in heaven. Children can get away with wearing anything and still look amazing.
I saw Kid Cuteture's Spring 2011 line and fell in love. It is full of the whimsical spring feeling with a very avant garde look to it. This picture immediately inspired me. I may have to do my own twist on this design.
I've been wanting to try out a onesie dress for my daughter and had a few spare white onesies lying around so that is how this project came about. I had these scraps of t-shirt material that was begging to me crafted into something so I started constructing different flowers that are similar to a mum or something of that sort. I did them in different colors and then sewed them by hand onto the onesie. For the dress part of this, I had a bottom half of a t-shirt so I attached that to some elastic, gathered and sewed away. I did everything by hand, therefore it took forever!! I also added some flowers to the skirt and used green floss to embellish the look of grass or stems. I am pretty happy with the outcome and the crispness of the all white. This just may a new favorite. I can't wait to get some pictures of the model in it.


